Setup ALIX.3D2
HW Setup
You need the following items to setup Meteohub hardware based on ALIX.3D2 board:
- PC Engines ALIX.3D2 system board
- PC Engines indoor metal case (silver) for ALIX.3 (incl. cover plate for the back, 4 screws, 4 transparent
- rubber feet, rubber parts to close unused WLAN mounting holes)
- front cover plate with cut-offs for 2 USB ports
- suitable external power supply (rated 18V 0.8 A)
- 4GB CF card
- optional: Compex WLM54G WLAN miniPCI card (802.11 b/g support)
- optional: WLAN antenna with 15 cm connector cable to miniPCI WLAN card
Having these items, installation of hardware components can be done in a few minutes. All you need is a screw driver and a tool to unscrew RS232 connector.
- Unscrew the 2 screws that are at the back of system board's RS232 connector. put the metal back plate onto the backend of the board and firmly connect backplate and system board with the screws just unscrewed from RS232 connector.
- Put CF card into corresponding on-board slot. CF cars must already hold Meteohub software.
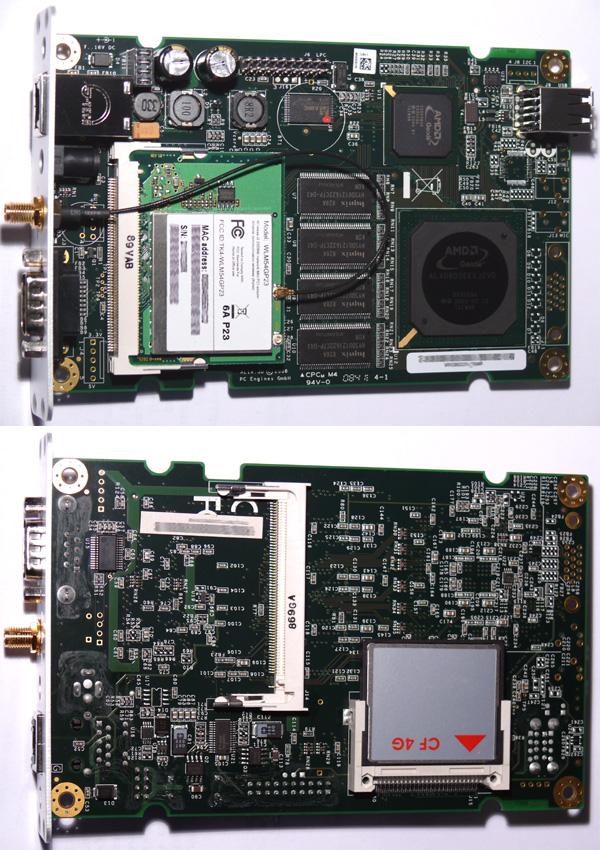
- optional: Put minPCI WLAN adapter into corresponding miniPCI slot on the board's upper side. MiniPCI cards are mounted in three steps: a) lift non-connecting side a bit b) push connector side into the slot while also pressing down the non-connecting side c) when you hear "click" it is fixed.
- optional: Mount WLAN connector into the corresponding hole of the metal back plate. Connect the end of the cable with "MAIN" labeled connector on WLAN adapter (see picture). The connector is tiny, make sure it is positioned correctly, then press to make it snap in.
- Push system board into the metal case. Make use of the rails inside the case to get the board positioned correctly.
- mount the back plate to the case by 4 screws. Mount front cover plate with 4 screws. Pay attention that cut-off of font cover plate does match with USP ports on system board.
- Put transparent rubber feet under the case. Close unused holes on the back plate with appropriate rubber parts.
Setup of CF Card
As the ALIX.3D2 cannot boot from USB stick transfer of data to the CF card has to be done manually. Meteohub distribution comes in form of a bootable USB stick image, so you need a USB stick (minimum capacity 512 MB) to hold the data to extract the CF card image from. Download zipped USB stick image "meteohub-vxyz.zip" (or newer) from here and unzip the image with a tool of your choice. Result is "meteohub-vxyz.img".
Windows
On Windows you need to download and run a special tool to do the required low-level writing to the USB stick. The tool of choice is "ImageWriter" from SuSE (you find additional information about this tool here). Please download ImageWriter.exe to your Windows PC. It does not need to be installed it is just a small executable to run. Please insert the USB stick into your PC wait a few seconds and then start downloaded "ImageWriter.exe". Wait until a dialog like this pops up:
Please select the inserted USB stick from the target drop-down list. Then open the file browser by clicking "Select" button. "*.img" files are not displayed by default so first thing to do is to enter "*.*" as file name. Having done that you will see the file "meteohub-vxyz.img" on the list. Select and open this file. Dialog should now look like this:
Press "copy" and the image data will be written to USB stick. Wait until operation has finished without error. When you browse with your PC to the just generated USB stick you will find a file named "meteohub-x86-4GB.gz" on it. Please decompress this archive to your HD. The file being extracted will be "image.bin". This is the one to be tansferred to the CF card of your ALIX.3D2. In order to do that, put the CF card into the CF card reader of your PC and use "ImageWriter.exe" as explained before to transfer "image.bin" to the CF card. Having done that, pull out CF card from your PC and insert it into the ALIX.3D2.
Linux
To get the image file from out of USB stick image you have to mount the "meteohub-vxyz.img" file as a loop device
mount -o loop meteohub-vxyz.img /mnt
As a result directory /mnt will show the files on the USB stick image, namely:
# ls -la /mnt
total 180688
drwxr-xr-x  2 root root     16384 Jan  1  1970 .
drwxr-xr-x 29 root root      4096 Nov  3 17:31 ..
-rwxr-xr-x  1 root root        62 May 22  2008 disk.lbl
-rwxr-xr-x  1 root root     69006 May 22  2008 g2ldr
-rwxr-xr-x  1 root root      8192 May 22  2008 g2ldr.mbr
-rwxr-xr-x  1 root root   5293470 Jan 20  2011 initrd.gz
-r-xr-xr-x  1 root root     11615 May 22  2008 ldlinux.sys
-rwxr-xr-x  1 root root   1374527 May 22  2008 linux
-rwxr-xr-x  1 root root 178074173 Jan  1  2011 meteohub-x86-4GB.gz
-rwxr-xr-x  1 root root      6329 May 22  2008 splash.png
-rwxr-xr-x  1 root root        61 Oct 20  2008 syslinux.cfg
-rwxr-xr-x  1 root root       156 Jan 20  2009 text.cfg
-rwxr-xr-x  1 root root    137992 May 22  2008 vesamenu.c32
-rwxr-xr-x  1 root root       159 May 22  2008 win32-loader.ini
The file that holds the data to be transferred to the CF card is "meteohub-x86-4GB.gz". Please insert the CF card of the ALIX box into the CF card reader of your Linux PC and check "dmesg". In the following example it has been mapped to "/dev/sdd"
# dmesg
...
[4239716.624145] sd 7:0:0:0: [sdd] 7962192 512-byte logical blocks: (4.07 GB/3.79 GiB)
[4239716.628767] sd 7:0:0:0: [sdd] Assuming drive cache: write through
[4239716.637641] sd 7:0:0:0: [sdd] Assuming drive cache: write through
[4239716.637645]  sdd: sdd1 sdd2 sdd3
We are just looking for "sdd" and are not interested in the partitions recognized on the stick (sdd1, sdd2, sdd3). The print out above tells that "/dev/sdd" is the target device. To make sure that the device ist not mounted by some background processes you should manually unmount all partitions by "umount". In the given example this will be
umount /dev/sdd1; umount /dev/sdd2; umount /dev/sdd3
When this throws errors about not mounted file systems that is fine. Don't worry. Now it is time to bring the already mounted compressed Meteohub image onto the stick. In the example above this will be done by
zcat /mnt/meteohub-x86-4GB.gz >/dev/sdd
Please be careful with that command. When you choose the wrong target (i.e. your system drive) this will be overwritten without further notice and you will have to restore your Linux box! When "zcat" has completed without error, this step is finished and you can pull the CF card from your Linux box and insert it to your ALIX box.
Start Meteohub
Boot the ALIX.3D2 with prpeared CF card inserted.
- You can now reach the Meteohub system by your desktop's/laptop's browser at the emergency IP 192.168.1.77 ("http://192.168.1.77") and if you have a DHCP server in your LAN you also can find your Meteohub at the address given by the DHCP server. [b]User name is "meteohub", password is "meteohub"[/b]. To reach the emergency IP with your browser you probably have to do reconfigure the IP address of your desktop/laptop as described in #Setup of unmodified NSLU2 in your LAN (explains how to bring you desktop into the same subnet as Meteohub). Having reached the Meteohub web interface you can set the IP persistently.
- Furthermore, the Windows tool "ipscan" (download here might be helpful to examine the IP that the router has given Meteohub via DHCP, if Meteohub is configured to make use of a dynamic IP via DHCP.
- About a minute after reboot Meteohub signals its IP by blinking rear LEDs.
Read the Blinks
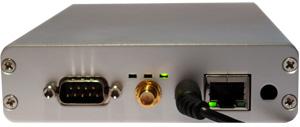
About one minute after starting reboot Meteohub signals its IP by LED blinking, as it has no buzzer attached. The three LEDs at the back are used for IP signaling. The picture below shows LED situation for standard Meteohub operation, where the right most LED is lit.
Signaling of the IP starts with long "A" (all three LEDs lit). After that each of the four numbers (delimited by a dot) will be signaled one by one. The dot between the numbers will be signaled by a "R" (right most LED lit). Each number is signaled by blinking digit per digit. Each digit is represented by a "L" (left most LED lit) repeated as often as the digit tells us. The zero digit is signaled by ten blinks. After having done this for all digits of all numbers of the IP, the end is signaled by a long "A" (all three LEDs lit) like it started with.
Example: IP 192.168.10.77 Legend: A = all LEDs lit, R = right most LED lit, L = left most LED lit, _ = all LEDs dark
Signal:                                          Comment
AAAA___R___R_R_R_R_R_R_R_R_R___R_R___L           192
___R___R_R_R_R_R_R___R_R_R_R_R_R_R_R___L         168
___R___R_R_R_R_R_R_R_R_R_R___L                   10
___R_R_R_R_R_R_R___R_R_R_R_R_R_R___AAAA          77
When Meteohub does not have a valid IP this will be signaled with three "A" blinks shortly following each other.


